(iStock)
Everything looks better tiled. Tile adds elegance, is durable, and stands up to wear and tear a lot better than a lot of other finishing materials.
You can tile just about any surface of your home in any style you can think of. Floors, bath tub surrounds, counter tops, and backsplashes can be enhanced with tile without mortgaging the house to do it.
Look at a decorating magazine or watch any one of the million home improvement shows on TV and you will see endless designs, from simple patterns to something Michelangelo wishes he could do.
Entire books have been written on the art of tiling and people have dedicated their lives to perfecting their skills. The fact is, just about any homeowner can do it.
Start as simply as possible. Pick a small project such as a back splash or small foyer. If you jump right into tiling the bathroom floor and make a mistake, you may be using the neighbor’s facilities for a few days.
The tools you will need are few. A putty or spackle knife, pliers, big clean sponge, and a bucket are the basics. A notched trowel, grout float, and a tile cutter are the more “job specific” tools you probably don’t have laying around but need for the job.
When it comes to tile, size does matter… aesthetically.
Decorators have long debated whether large tile in a small space makes the place look bigger or draws too much attention to the tile. I find more and more customers asking for larger tiles in smaller spaces and I’m happy to oblige. It can be easier to cut, and set, a few big tiles then a lot of little ones. Go with what you like and don’t worry about any design “rules.”
The type of tile you choose will be directly related to what you are tiling. These days ceramic, porcelain, and natural stone tiles come ready for just about any application, so pick the one you like that is designed for the place you want to tile. If this is your first time, stick with a ceramic tile because it can be inexpensive and are the easiest to start with if you have never done this before. You can find a wide variety sizes and colors from just a few cents a piece and on up.
Keep in mind that wall tiles are for walls, and you should only use floor tiles on the floor because they are thicker and can take the traffic.
Which ever size or material you choose they all get “set” in a similar fashion, you stick them to the wall or floor with mortar. Then the spaces between the tiles are filled with grout and the grout gets sealed. Some tile, such as natural stone, may need to be sealed too.
Easy right? Almost. There is some preparation.
Before you begin make sure you have a solid and smooth base for the tile. Plywood is not a good base. Use a cement backer board as a sub floor or in areas that will be getting wet. Old wall paper, flooring, and other adhesives need to be removed first. If you don’t prep the surface your tile can crack or pop and you’ll have a horrible looking job.
The other part of the prep is laying out the tile pattern. You will find multiple chapters in how-to books on the methods, and I recommend you grab a latte and settling in for a little reading. If you don’t figure out the layout first you end up cutting more tiles than necessary and your pattern can end up askew.
Once you have a good surface and the layout is set, you need something to make the tiles stick.
Professional tile installers prefer mixing their own mortar for most jobs, but you can use the pre-mixed stuff. The pros will scream that you are wasting your money premixed when you can mix the materials yourself at a fraction of the cost. This is true, except that mixing your own requires more tools and you need a place to make a big dusty mess. The premixed mortar is a great way to go for a first-timer.
Pre-mixed or not you still have to do the math on what “coverage” you’ll get from each container. You need to know the size of tile, its thickness, how thick you want the grout lines, and how big of an area you are covering. You will find a chart on back of the package to help calculate how much you will need. Get a little extra so you can save a trip back to the store if your math is rusty.
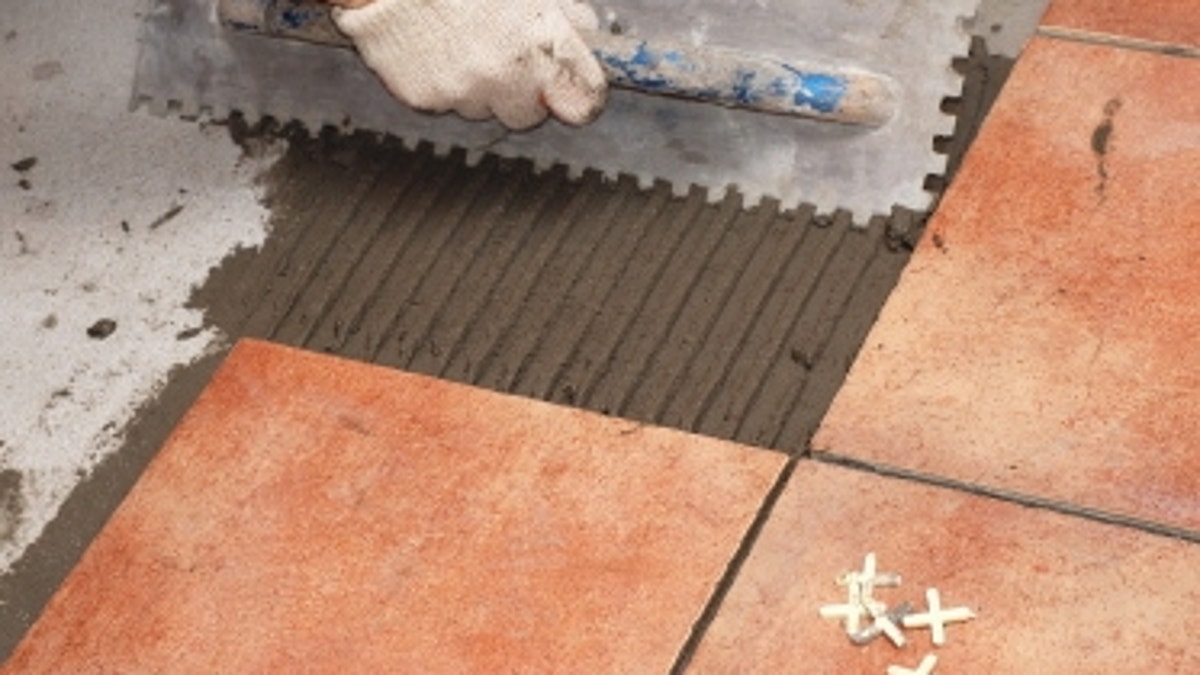
The mortar is spread on the surface with the notched trowel. The size of the notches in the trowel relate to the size of the tile and the application you choose. Simply put, bigger tile equals bigger notches. Proper technique is important because the grooves you create in the mortar with the trowel create the suction that holds the tiles firm.
Cutting tile is basically score and snap. By scoring the glazed surface of the tile and putting pressure on either side of the score line, the tile will snap evenly. Even the most seasoned tile setter will break a few by mistake, and you will too so be mentally prepared to do so.
There is more than one way to cut tile. You can go crazy and rent a wet saw, if you’re doing a big job. For a small first time project buy a tile cutter that looks like one of those paper cutters from elementary school art class. It has a long handle and sharp wheel with a flat surface and can cost as little as twenty dollars. You place the tile on it, score it with the wheel and press the handle to snap the tile.
Setting tile takes a little practice but you will get into a groove. Follow the layout lines that you established during your prep. Set the tile flat and press them firmly into the mortar. A little may gush out like the mayonnaise in your roast beef sub, just clean away the excess before it dries. The next one is set the same way using spacers between the tiles to keep things even. These spacers are white plastic or little rubber Xs and come in a variety of thicknesses. They get pulled out before grouting.
Newly set tile should dry overnight before grouting. Fortunately premixed grout is now widely available in a ton of colors. Again, avoid the hassle of mixing on your first job.
The grout is spread using a grout float which looks like a really hard rubber pad with a handle. The grout is pressed into the lines with the float and then the excess is skimmed off by holding the float and an angle and pulling across the tile. Take your time; this is the finished product you are dealing with. Be patient and make sure the grout lines are smooth and even in depth.
When the grout lines are firm to the touch, they are lightly wiped down with a damp sponge. Do not use a dripping wet sponge which can ruin your grout. Allow the grout to dry according to the manufacturer’s specifications and then wash down the tile again with the damp sponge. It may take a few washes and a buff with a cloth to get all haze off the tile. To keep it looking new, use a good sealant.
That’s the basic idea of tiling. If you know what you are in for, plan properly, and have a little patience… you can tile anything.