Don’t let summer slip through your fingers this year. Make the most of it with a DIY project. You don’t have to be especially handy to undertake a project that will help you seize the summer. Whether you’re hosting friends for a barbecue or looking for a way to keep the kids busy during summer vacation, here are plenty of projects for even the most novice do-it-yourselfers.
Build a Smoker
Hungering for a rack of ribs with meat just falling off the bone? Or maybe a smokey pulled pork sandwich dripping with homemade sauce is more your speed. A smoker is an all-important tool for the true barbecue connoisseur. But rather than drop hundreds on a store-bought smoker, why not make your own for a fraction of the price?
What you’ll need:
- 2 terra-cotta planters
- 3 bricks
- 1 hot plate
- 1 heavy cooking dish
- 1 round grill grate
- Wood chips
- Probe thermometer
Start by feeding the hotplate’s cord through the planter’s bottom hole and place the hotplate on the bottom of the planter. Next, create a stand with the three bricks for the planter to rest on so that it is not directly on the ground and air can get through the bottom hole. Put the heavy duty cooking dish directly on the hotplate and add a few wood chips to it. Make sure your dish is big enough to completely cover the hotplate as you’ll want catch any drippings from the meat. Fit a round barbecue grate into the planter — if you already have a grill, you can use that grate, if not, you can buy one online for under $20. Finally, flip the second terra cotta planter upside down and place it on top of the main smoker. Pop a probe thermometer down the hole in the planter’s bottom — which is now the smoker’s top — to enable you to keep an eye on the temperature. In a few hours, you’ll be enjoying delicious barbecue on your homemade smoker.
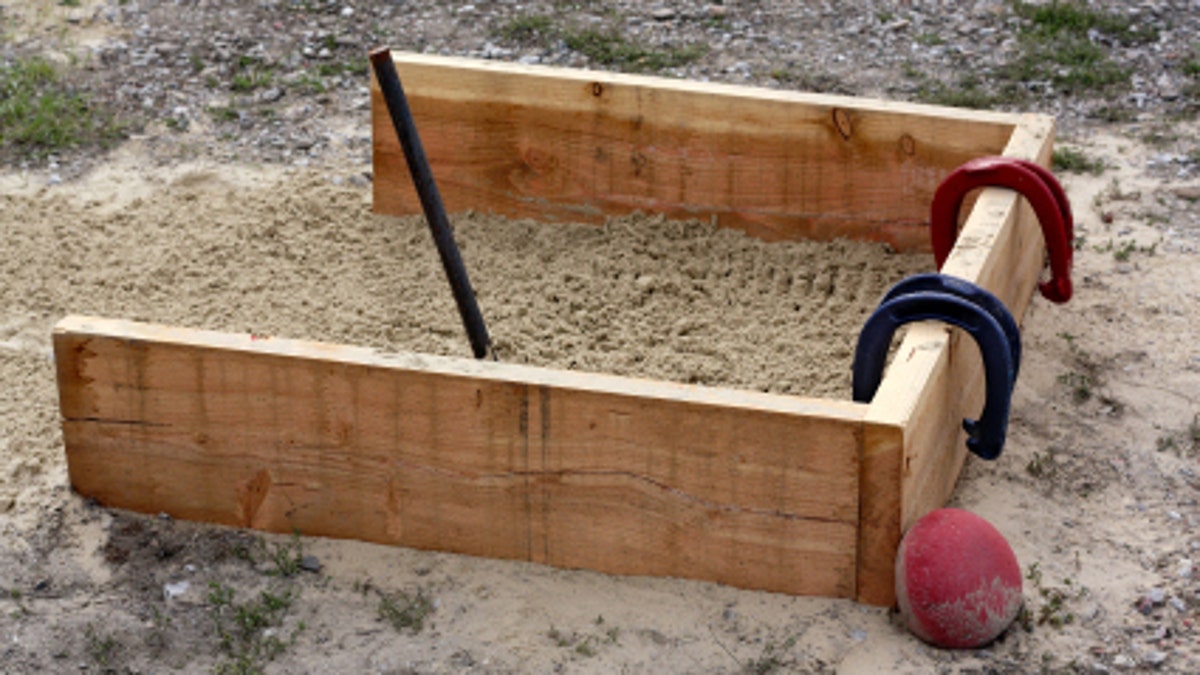
Construct a Horseshoe Pit
Invite some friends over for a relaxing afternoon in the backyard, or keep the kids busy during their summer vacation with your very own horseshoe pit.
What you’ll need:
- Steel stake or pole (a piece of rebar will work for this)
- 4 2x4s
- Sand
- Set of horseshoes
At its most basic, a horseshoe court is a pole in the dirt. But you can build a better looking, more sophisticated court in an afternoon. First find a level piece of lawn. At one end, you’ll need to dig a pit three feet wide, four feet long and four inches deep. Next, you’re going to construct a wooden frame for the pit. Using a circular saw, cut two 2x4s at a length of 36 inches each and two more at a length of 48 inches each. Make a rectangular box shape with the 2x4s and secure each corner with two nails. Place the box around the pit, making sure it is flush with your lawn. Fill the box up with sand and drive the stake into the box’s center, tilting it at a 12 degree angle toward the pitching line. Finally, using a measuring tape, mark the pitching line 40 feet away from the stake.
Start a Compost Pile
Enrich your garden this summer with some of your very own homemade compost. Done right, a compost pile won’t stink or attract animals, and can produce soil in a couple of months.
What you’ll need:
- Compost bin or chicken wire
- Food scraps (but no animal products, such as bones or leftover meat) and dried leaves
- pitchfork or shovel
Get a compost bin that will let in plenty of air, which is needed to help break down the bio-matter. Chicken wire is a great alternative to a traditional bin and you can make a simple enclosure by rolling the wire into a cylinder, fastening it with some twine and standing it up on one end.
Composting is pretty simple — in truth, a universe of bacteria is going to do all the work for you — but there are some things to keep in mind. First, getting the right mix of “brown” and “green” compost ingredients is key. Too much green compost — these are wetter materials, like table scraps — will make your compost rot and stink. So make sure to mix this kind of compost with equal parts of dried material, like leaves, paper and dried grass clippings.
Next, make sure the compost is getting plenty of air, which will help feed the micro-organisms that are dining down on your waste. Every week or two, turn your compost with a pitchfork or shovel. The more you turn it, the faster you’ll get rich soil ready for your garden.
Finally, while you’re turning your compost, spray it with a little bit of water. You want it to be a little damp, but not too wet, in order to stimulate the growth of microorganisms, but not cause the pile to rot.