(Kyle Books)
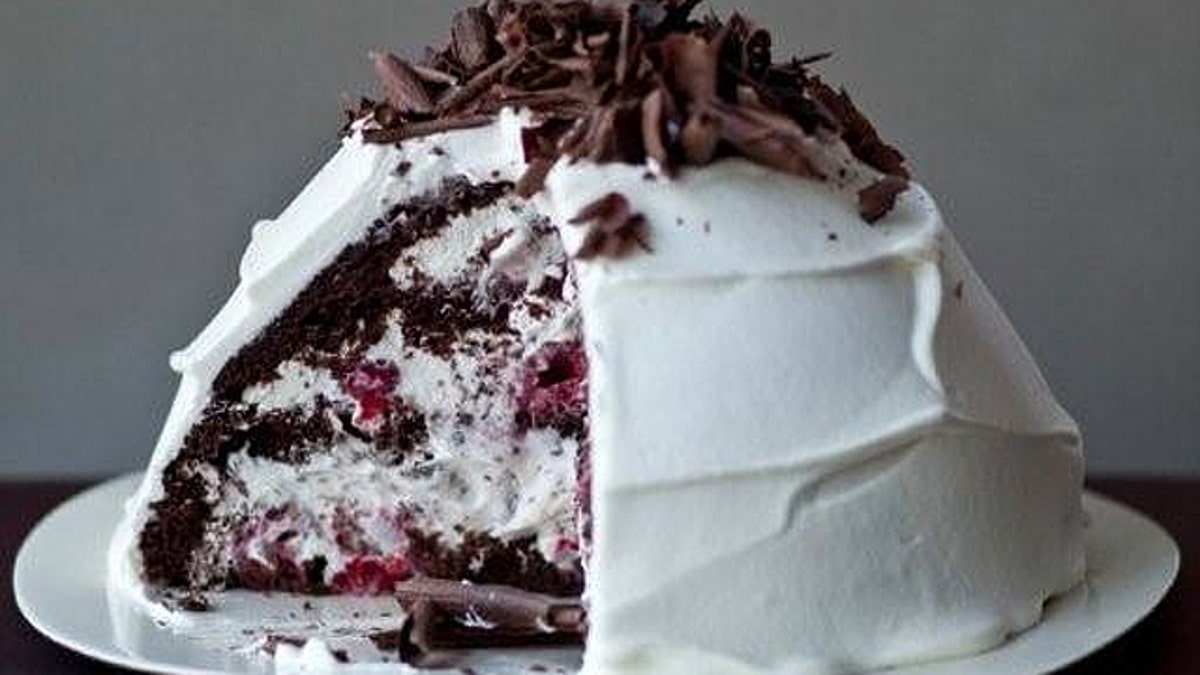
This is an original and amusing presentation for plain old devil’s food cake. It’s sliced vertically and layered in a bowl with whipped cream. You can even sprinkle on a little dark rum and/or a handful of raspberries along the way. After spreading the outside of the unmolded cake with whipped cream, you may press chocolate shavings against the cream or crumble any bits of leftover cake and use them instead.
Makes one 8- to 9-inch dome-shaped cake, depending on the size of the bowl used:
2 layers Devil’s Food Cake
Whipped cream, made with
4 cups cream and 1/2 cup sugar
1/4 cup dark rum for sprinkling, optional
1/2 pint fresh raspberries, optional
Chocolate shavings or fine devil’s food
cake crumbs for finishing
One 1 1/2- to 2-quart round-bottomed bowl, buttered and lined with plastic wrap
1 - Cut the devil’s food layers into 1/4-inch-thick vertical slices.
2 - Line the bowl with a single layer of the slices, patching them together if necessary.
Sprinkle the slices with rum.
3 - Spread a large spoonful of whipped cream on top of the layer.
4 - Trim 2 or 3 cake slices to the diameter of the bottom of the bowl and arrange them
on the cream. Sprinkle with rum and spread with more cream. If you’re using
raspberries, sprinkle a few on each layer.
5 - Repeat, cutting enough cake slices to fit the changing diameter of the bowl as you
build up higher and so that they cover the previous layer of cream, until the bowl
is full. Finish with a layer of cake.
6 - Wrap and chill the bowl at least 4 hours or overnight. If chilling the cake overnight, only whip 3 cups of the cream as in the recipe on page 159 and whip the rest for covering the cake soon before you’re going to serve it.
7 - Place a cardboard or platter on the bowl and invert, then lift off the bowl. If the
cake is stuck, wring out a clean kitchen towel in hot water and place on the bowl.
This will melt the layer of butter between the bowl and the plastic wrap, then you
can lift off the bowl and carefully peel off the plastic.
8 - Spread the outside of the cake with the remaining whipped cream and sprinkle
with chocolate shavings or fine devil’s food cake crumbs.
Serving: Since the cake is tall, it’s difficult to serve even wedges. Use a sharp thin
knife to cut them and use a wide cake server or other spatula to transfer them to plates.
Storage: Tightly wrap leftovers with plastic and refrigerate and plan on serving all of
them within 24 hours for best flavor.
ESSENTIAL TECHNIQUE
Oil-based devil’s food cake batter:
Using vegetable oil in a cake works well when the batter
contains strong-flavored ingredients that would mask the
flavor of butter. Makes two 9-inch round layers, 2 inches tall:
4 ounces unsweetened chocolate,
cut into 1/4-inch pieces
1 cup boiling water (boil, then measure)
1 cup granulated sugar
11/2 cups all-purpose flour (spoon into
a dry-measure cup and level off)
1/2 teaspoon salt
3/4 teaspoon baking soda
1 cup light brown sugar, firmly packed
1/2 cup vegetable oil, such as safflower
1/2 cup sour cream
2 large eggs, at room temperature
11/2 teaspoons vanilla extract
Two 9 x 2-inch round cake pans, buttered and the bottoms lined with disks of buttered parchment or wax paper
1 - Set a rack in the middle of the oven and preheat to 350˚F.
2 - Place the chocolate in a large mixing bowl and pour the hot water over it. Shake the
bowl to make sure all the chocolate is submerged, then let stand for a few minutes
to melt the chocolate.
3 - In a mixing bowl, stir together the sugar, flour, salt, and baking soda and set aside.
4 - Whisk the chocolate and water smooth, then whisk in the brown sugar, oil, sour
cream, eggs, and vanilla one at a time, whisking smooth after each addition.
5 - Whisk in the flour mixture about one third at a time (A). The batter will be
very liquid.
6 - Divide the batter between the prepared pans (B). Bake until risen and firm,
30 to 35 minutes.
7 - Let the cakes stand in the pans for 5 minutes, then unmold to racks, turn right side
up, and cool completely. To finish as a layer cake, see Chapter 15 and use boiled
icing, whipped cream, ganache, or buttercream to fill and cover the cake.
Storage: Wrap and freeze the layers for up to one month if you don’t intend to use
them immediately.
ESSENTIAL TECHNIQUE
Sweetened whipped cream
Making perfect whipped cream and finishing a cake with it isn’t difficult, but you have to remember a few basic rules: Keep everything cold, and don’t over-whip. Softly whipped cream holds its shape well and doesn’t disintegrate on the outside of a cake.
Makes about 5 cups, enough to fill and finish a 9-inch cake:
3 cups heavy whipping cream, ice cold
1/3 cup sugar
2 teaspoons vanilla extract
1 - About 30 minutes before whipping the cream, chill the mixer bowl and
whisk in the refrigerator. Take out and put the cream, sugar, and vanilla in the bowl and whisk once by hand to mix. Place on the mixer fitted with the whisk attachment and whip on medium high until you see traces of the whisk holding in the cream.
2 - Decrease the speed to medium and continue whipping until the cream holds a soft peak on the end of a rubber spatula.
3 - Cover the bowl and chill the cream until you need it. Before using the refrigerated whipped cream, re-whip it briefly by hand to a soft peak again.
From Bake!: Essential Techniques for Perfect Baking (Kyle Books; 2010)
Fun stories about food, relationships, the great outdoors and more.